
Introduction
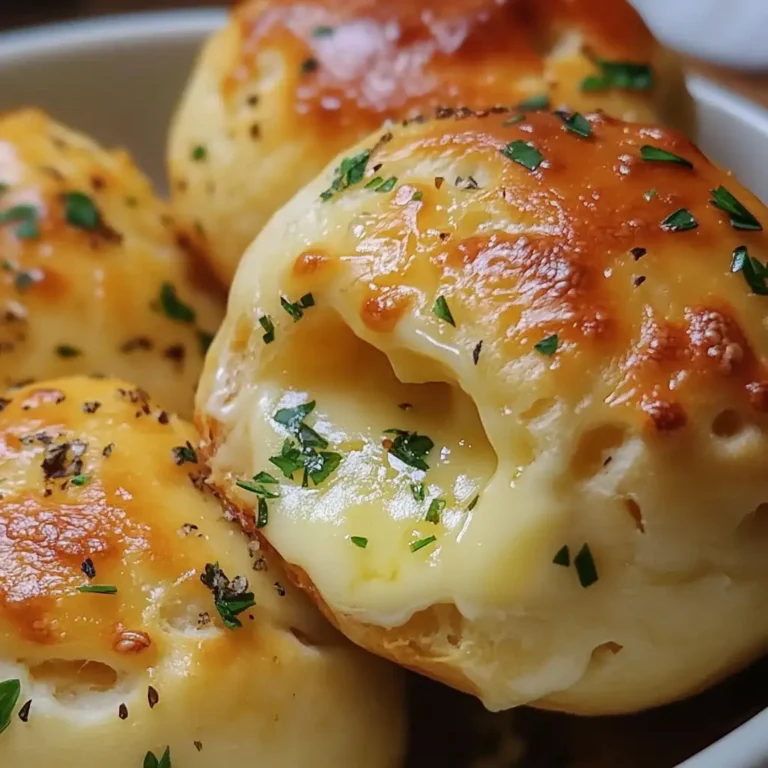
Biscuit Garlic Butter Cheese Bombs are the ultimate savory snack, perfect for any occasion. These delicious, cheesy bites combine the rich flavors of garlic butter with gooey melted cheese, all wrapped up in a golden-brown biscuit. They are quick to prepare and guaranteed to be a hit at any gathering or as a delightful appetizer for your family.
Overview of the Recipe
This recipe uses refrigerated biscuit dough, ensuring a convenient and time-saving preparation. The biscuit dough is quartered, dipped in a flavorful garlic butter mixture, and topped with a blend of mozzarella and Parmesan cheese. Baked to perfection, these cheese bombs are finished with a sprinkle of fresh parsley for a burst of color and freshness.
Ingredients
- 1 can refrigerated biscuit dough
- 1/2 cup unsalted butter, melted
- 4 cloves garlic, minced
- 1 cup shredded mozzarella cheese
- 1/2 cup grated Parmesan cheese
- 2 tablespoons fresh parsley, chopped
- 1/2 teaspoon garlic powder
- 1/4 teaspoon salt
- 1/4 teaspoon black pepper
Instructions
- Preheat Oven and Prepare Pan:
- Preheat your oven to 375°F (190°C).
- Grease a muffin tin or line it with paper liners.
- Prepare Garlic Butter:
- In a small bowl, combine the melted butter, minced garlic, and garlic powder. Mix well to ensure the garlic is evenly distributed.
- Prepare Biscuit Dough:
- Open the can of refrigerated biscuit dough and separate each biscuit round.
- Cut each round into quarters, resulting in four pieces per biscuit.
- Roll each piece into a small ball.
- Coat with Garlic Butter:
- Dip each biscuit ball into the garlic butter mixture, ensuring it is well-coated.
- Place the coated biscuit balls into the prepared muffin tin.
- Add Cheese:
- Sprinkle shredded mozzarella and grated Parmesan cheese generously over each biscuit ball.
- Bake:
- Place the muffin tin in the preheated oven.
- Bake for 12-15 minutes, or until the biscuits are golden brown and the cheese is melted and bubbly.
- Garnish and Serve:
- Remove the muffin tin from the oven.
- Sprinkle the freshly chopped parsley over the cheese bombs while they are still hot.
- Allow them to cool for a few minutes before serving.
Serving
Serve these Biscuit Garlic Butter Cheese Bombs warm from the oven. They are perfect as an appetizer, side dish, or a tasty snack. Arrange them on a platter and watch them disappear quickly at any gathering. For an added touch, serve with marinara sauce or a garlic aioli for dipping.
Pairing and Serving Suggestions
These cheese bombs pair wonderfully with a variety of dishes. Serve them alongside a fresh salad for a light meal, or as an accompaniment to pasta dishes and soups. They also make a great party snack, paired with a selection of dips and spreads.
Variations of the Recipe
- Spicy Cheese Bombs:
- Add a pinch of red pepper flakes to the garlic butter mixture for a spicy kick.
- Use a mix of mozzarella and pepper jack cheese for a spicier flavor.
- Herbed Cheese Bombs:
- Incorporate a mix of dried Italian herbs (such as oregano, basil, and thyme) into the garlic butter mixture.
- Sprinkle additional herbs over the cheese before baking.
- Cheesy Bacon Bombs:
- Add crumbled cooked turkey bacon or chicken ham to the cheese mixture before sprinkling on the biscuit balls.
- Stuffed Cheese Bombs:
- Insert a small cube of mozzarella cheese inside each biscuit ball before dipping in the garlic butter mixture for an extra cheesy center.
Health Benefits
While these cheese bombs are an indulgent treat, they can still offer some nutritional benefits when enjoyed in moderation:
- Calcium: The cheese provides a good source of calcium, essential for bone health.
- Protein: The cheese and butter contribute to the protein content, which is important for muscle maintenance and repair.
- Garlic: Known for its potential immune-boosting properties and antioxidant benefits.
Notes
- Storage: Store any leftover cheese bombs in an airtight container in the refrigerator for up to three days. Reheat in the oven to restore their crispiness.
- Freezing: These cheese bombs can be frozen after baking. Allow them to cool completely, then freeze on a baking sheet before transferring to a freezer-safe container. Reheat in the oven directly from frozen.
FAQs
1. Can I use homemade biscuit dough?
- Yes, homemade biscuit dough can be used. Simply prepare the dough according to your favorite recipe and proceed with the instructions as directed.
2. What type of cheese works best?
- Shredded mozzarella and grated Parmesan cheese are recommended for their melting properties and flavor. However, you can experiment with other cheeses like cheddar or gouda.
3. Can I prepare these in advance?
- Yes, you can prepare the biscuit balls and coat them in garlic butter in advance. Store them in the refrigerator and add the cheese just before baking.
4. Are there gluten-free options for this recipe?
- Yes, you can use gluten-free biscuit dough available in stores or make your own gluten-free biscuit dough at home.
5. Can I add other toppings?
- Absolutely! Feel free to get creative with toppings like sesame seeds, poppy seeds, or additional herbs for extra flavor and texture.
Conclusion
Biscuit Garlic Butter Cheese Bombs are a delightful and easy-to-make treat that will impress your guests and satisfy your cravings. With their golden, cheesy exterior and soft, flavorful interior, these cheese bombs are sure to become a favorite in your household. Whether served as an appetizer, side dish, or snack, they are a versatile and delicious addition to any menu. Enjoy the rich, garlicky goodness and the gooey melted cheese in every bite!